Mastering the Mix: A Comprehensive Guide to Perfecting Audio Production

learn how to make your music-making time more productive and fulfilling. credit: Ableton
When I first got into music production, finishing tracks was easy. No feeling is better than listening to your first completed tracks and imagining what could happen next: hearing them on the radio for the first time, working on them in a professional studio, winning a music award... But then, something happened.
Pretty soon after I started uploading tracks, I developed mixed feelings. Specifically I started to notice differences between my tracks and ones by more successful artists - my tracks sounded quieter and had a sort of ‘stuffy’ or ‘cramped’ sound. All the elements seemed ‘unbalanced’. I'd notice myself turning up the volume to listen to my tracks at the same level as other artist’s releases.
At this point, I knew something in my method was wrong. but looking online for answers was basically a minefield of textbook-sounding names for a bunch of things I either didn’t care about, or that intimidated me.
This is where music production started to seem boring and tedious. And for a while, this completely destroyed my creative drive.
So we’ve put together this handy guide to help you achieve better mixes in just 10 minutes with the help of @ICECOLDFINGAZ 👀
This is one the easiest mistakes to make when you first start mixing and mastering your own audio.
Unless it’s in very specific circumstances…
Subtractive EQ is always best.
This is because generally, EQ is about balance.
Subtractive EQ = Subtracting frequencies (turning them down)
Additive EQ = Adding frequencies (turning them up)
Sometimes though, you’ll need to remove specific frequencies.
As we mentioned before, some frequency ranges, like 180-250Hz, cause common problems that make your track sound unprofessional and unfinished.
Here’s a graphic that explains which frequencies create common problems, and where to boost to give a sound something extra.

Get to know how to describe frequencies. credit: Mastering the Mix

a useful way to visualise volume changes in your mix. credit: Mastering The Mix
Gain staging can be defined as:
the process of managing and organising the volume levels of each element of your track.
Using the template below, you’re ensuring each element is at the ideal level to be mixed and mastered effectively.
By creating a limit for each kind of sound (i.e. kick, piano, bass) within your track, you can more easily decide on what needs to be loud, what needs to blend in, and what needs to be quiet.
It sounds simple, but this is the hardest part of mixing any project.

quick template for you all to use here in your DAW. credit: Jim Lynch Codes (Youtube)
It’s natural to think if you want hear an element of your track more, you should turn it up…
But, without each element being at different volume levels, nothing sounds loud.
Without clear volume differences between each element of your track, your mix sounds unbalanced and all elements appear to be at the same volume.
This is why by making a conscious decision to gain stage your project, and by having the correct headroom (-6dB on the master fader), you set yourself up to make a clean, loud and balanced mix. It also makes the mastering process as easy as possible for you too.
Going a bit deeper into this, if you over-EQ each element of the track, you can run into a lot of more advanced audio issues, such as ‘phasing’. We’ll explain this more in another article.
More importantly, this is a waste of time. You don’t want to listen to a track too many times - you’ll simply get bored of it.
As well, you’ll lose your objectivity. We all know what music should sound like. But by over-listening to a track, you get used to it sounding a certain way, and it’ll become harder to hear what needs to be improved.
Finally, this is a really important bit of advice.
When applying all processes in music production, whether you’re a beatmaker or an engineer recording bands/instrumentalists, moderation is key.
Moderation is applicable to every element of the music-making process. Do you want all the sounds to be in the centre of the mix? Do you want all the sounds to be in the same frequency range? Do you need all the sounds to be the same volume?
Once you ask yourself these questions a few times, the process begins to become a habit. And once you build a solid foundation of music production projects that apply this habitual process, and you’re happy with the output, you can begin experimenting.
And this is where the creativity and fun really begins.
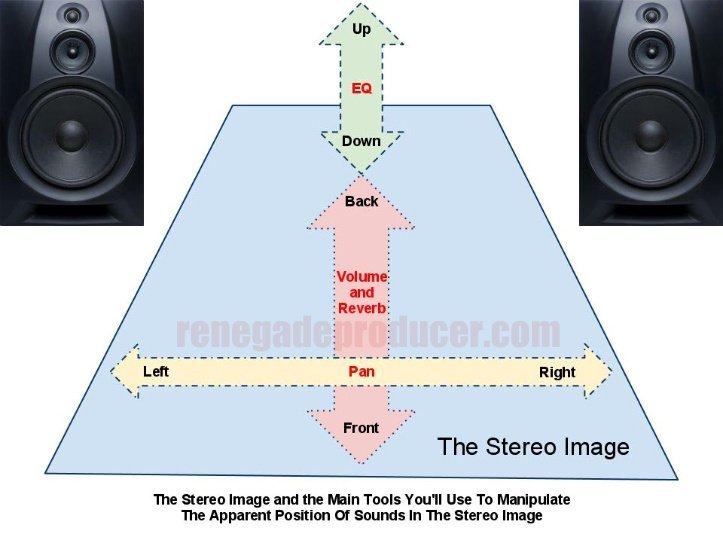
last thought - a handy guide to visualising fundamental parts of audio mixing. credit: Renegade Producer